
For my first tutorial as a Photoshop Elements Brand Ambassador, I'm going to share with you how to make a circular blog button. This button can be used for countless things: a profile picture, social media links, links to particular pages or blog features, sharable buttons, or even as an advertisement if you choose to sponsor another blog.

I get quite a bit of email inquiries on how to make blog buttons, and the best part of this tutorial is that you can make literally any shape you want. If you just want a standard square or rectangle, just skip the "Cookie Cutter" steps (steps 2 + 3) and head on into adding your text! If you want a speech bubble, a heart, or anything else your heart desires, just click through the shapes offered by PSE. One great thing about Adobe Photoshop Elements is that it makes doing shaped clipping masks insanely easy! If you have standard Photoshop then there are a few more steps you have to take to do it manually, but that's not too hard either. I'll be sharing screenshots throughout so you can follow along. Feel free to click on the screenshots to make them full size so you can see exactly what I'm doing. The directions will also be in the text in case you can't make out the buttons.
Anyway, let's get started!
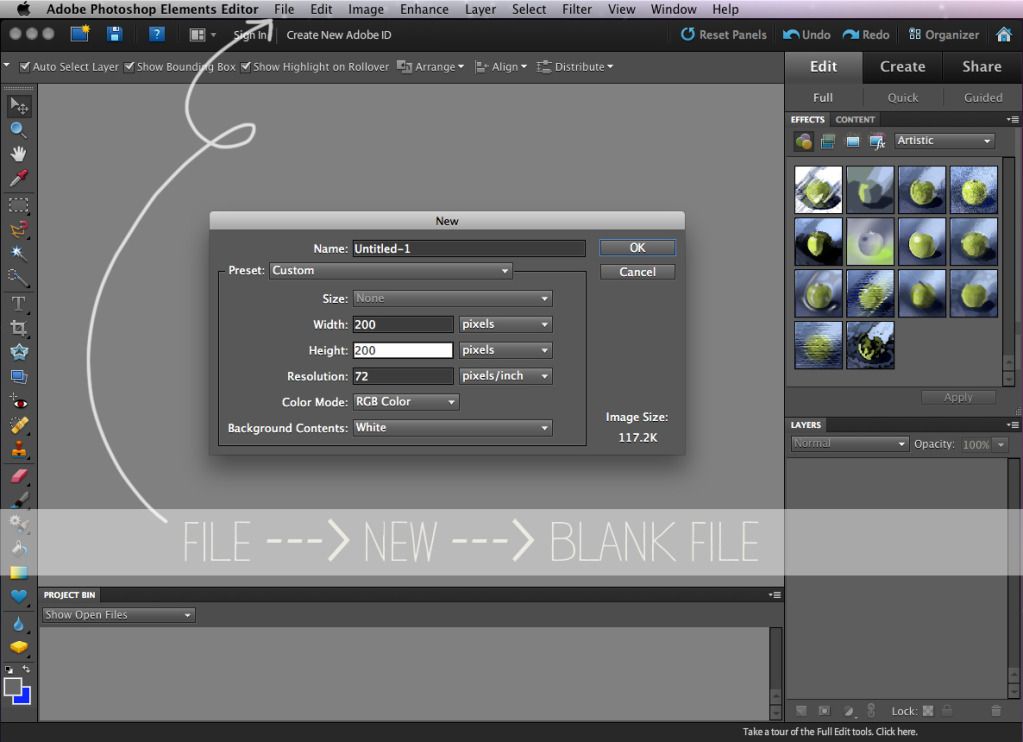
1. Start by opening up Photoshop Elements. Click File --> New --> Blank File to begin. Decide on what size you want your button to be. A good "safe" width for most Blogger blogs is 200 pixels wide, by however tall you want. Since we want a perfect circle, I'll do 200x200. *Make sure your resolution is set to 72 and your Color Mode is RGB!
Sidenote: Resolution refers to DPI (dots per inch) and 72 is the standard for computer monitors and tvs. Same with RGB. That's because all of the little dots you see making up a tv screen are red, green and blue! 300 is the standard resolution for anything that will be printed. CMYK, which stands for Cyan, Magenta, Yellow and Black , is the color mode for printing.
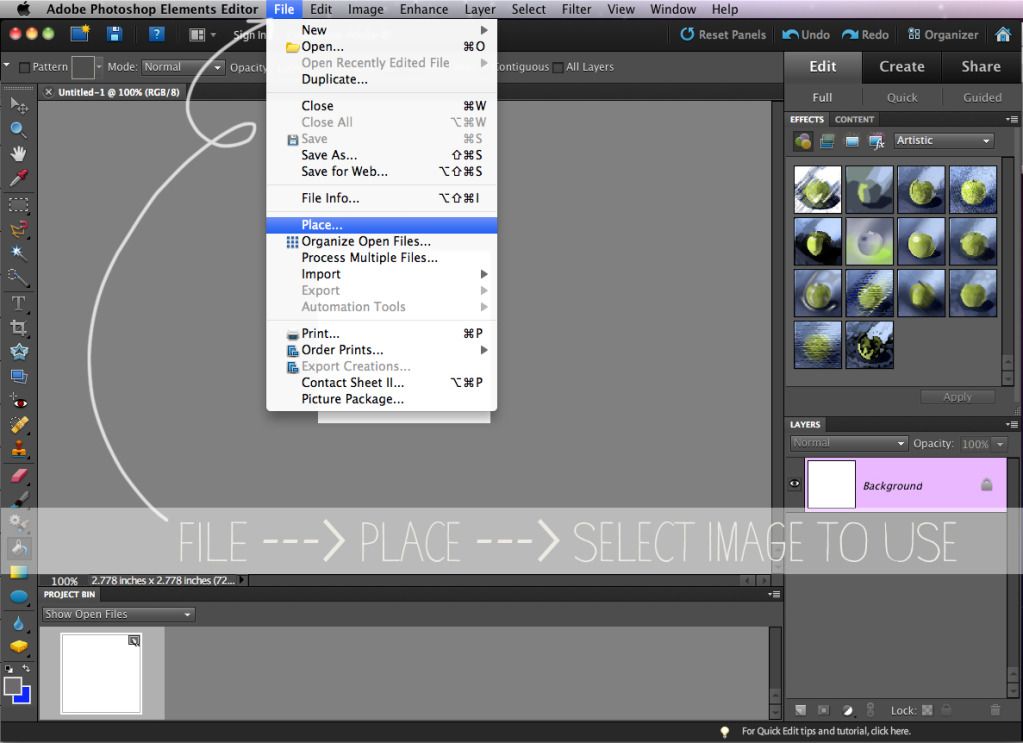
2. Choose the image you want to use as your button by clicking File --> Place. You can Transform your image to fit the canvas by pulling on the anchor points located on the corner of the image and in the middle of each side. *Tip: Hold "Shift" as you transform the image so it will retain it's proportions without getting skewed.
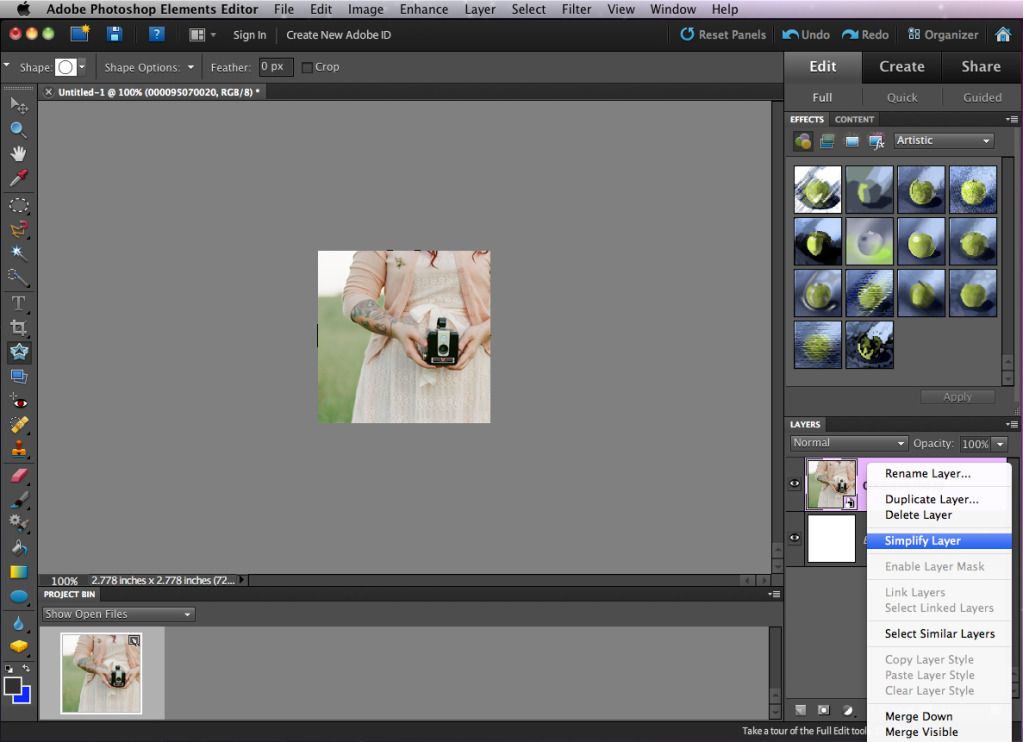
3. Once you have your image situated as you would like, CTRL + Click (Right-click on a PC) the image layer on the Layers palette, and click Simplify Layer.
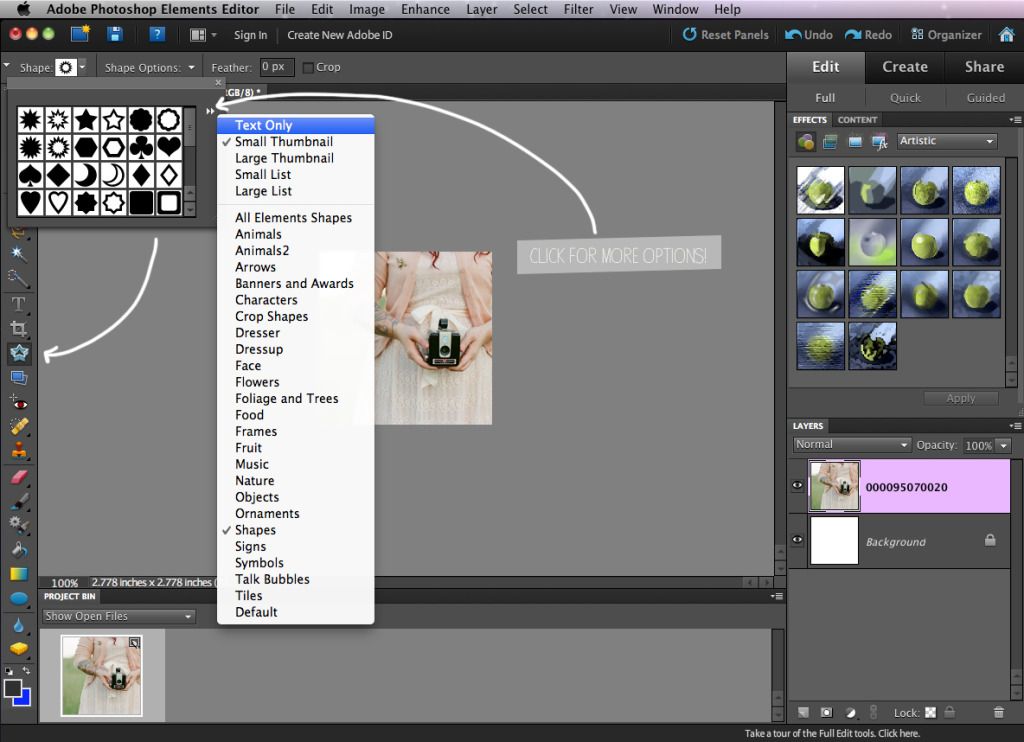
4. After you layer has been simplified, Select the "Cookie Cutter" tool on the left tool bar (It's located under the crop tool, and it looks like stacked stars!). Select the shape you want your button to be made into. For this tutorial, I chose a solid circle. *Tip: Click the two arrows on the right of the shape palette to load even more options!
You can play around with size and placement of your shape as much as you'd like. You can also hold down the Shift key while placing it and it'll keep it's proportions! This is really important when it comes to shapes like circles.
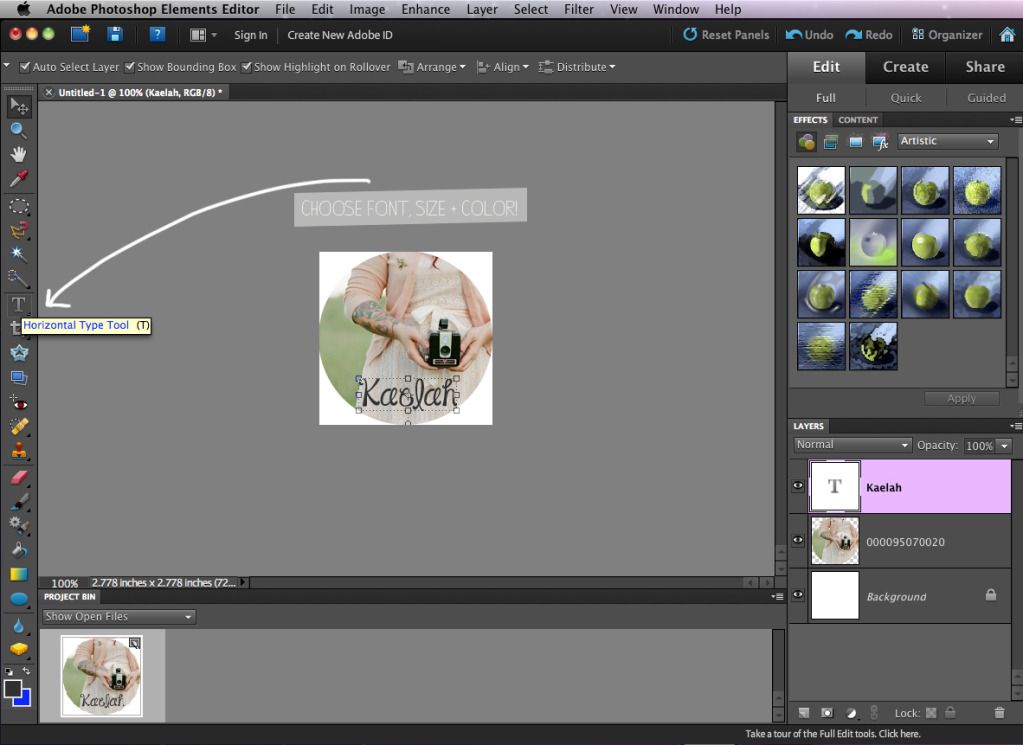
5. If you'd like to add text to your button, Click the Horizontal Type Tool and choose the font, color and size. You can always edit your text after you place it, don't worry!
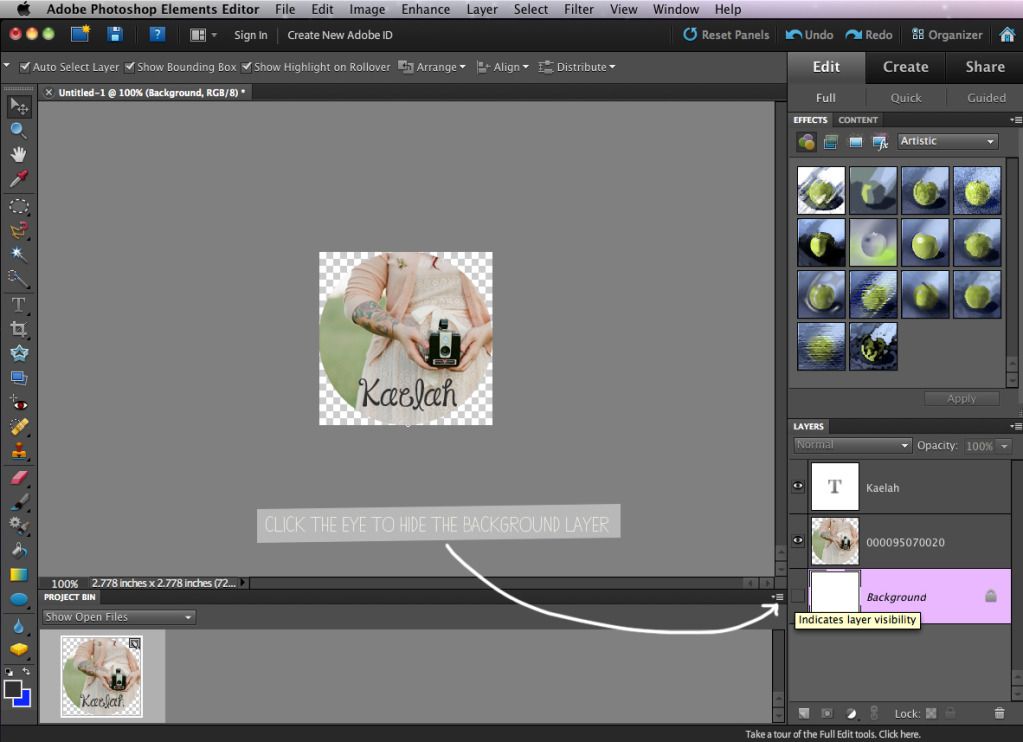
6. If your shape is anything other than a square or rectangle, Click the eye icon to the left of the Background layer to hide it. Once you save your button as a PNG file, this will allow you to put it on any color background and you won't have an ugly white square border behind it.

7. Once your button is just how you'd like it, Click File --> Save As and name your button. Choose the folder you'd like it to be saved in and click "Format". Choose PNG if your button is anything other than a square/rectangle, or choose JPEG otherwise.
*Sidenote: PNG files save the image so that it has a transparent background. A JPEG simply compresses all of the layers and the white background will show up if your shape is a circle, etc. Also, when saving your button as a JPEG, the Options prompt will come up after clicking "Save" and ask you for the Quality. "10" is always a safe bet! If you want to keep a editable version of the button with all of the layers intact, also choose to save a Photoshop/PSD version! You can open this file from Photoshop at any time and make any changes that you want.
Now you're free to use your button for whatever you wish! You can use it as a profile picture on the sidebar, or you can make social media/featured post buttons, too. You can also use this as a way to make your own sharable blog buttons to swap with friends.
If you'd like to have the sharable buttons on your blog, along with the code for people to copy + paste, read below!
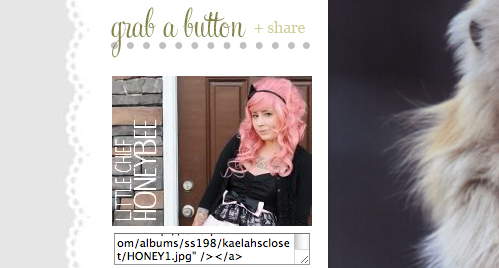
Another question I get pretty often when it comes to blogging is how to code the little box with the HTML for people to take and share. Just copy the HTML in the box underneath, paste it into a widget on your sidebar (or on a Buttons page) and plug in your own URL and image link! *Note: The code below includes the code to have the image above the box as well! That way people know which button they're choosing!
Copy and paste the following code where you want your button + HTML box to show up! Make sure you delete the asterisks (*) before saving!
<*textarea cols="23" rows="2"><*img src="URL TO YOUR BUTTON HERE!"><*a href="URL TO YOUR BLOG/PAGE HERE!"><*img src="URL TO YOUR BUTTON HERE!"><*/a><*/textarea>
Well friends, that'll do it! Hopefully that was decently easy to understand, and hopefully some of you found that helpful! If you have any specific requests for future Photoshop features or tutorials, I'd love to hear them! Just let me know what you'd like to learn!
♥ ♥ ♥ ♥ ♥ ♥ ♥ ♥ ♥ ♥ ♥ ♥ ♥ ♥ ♥ ♥


Oh Kaelah! You just made my year!!! I have been after a tute on those 2 EXACT things! You little legend! That was super easy to follow too.
ReplyDeleteThanks so very much, Darlin'!
Luvluv,
Shann xxx
so very glad it was helpful! xx
DeleteTHANKS A 1000 times!!
ReplyDeletethat is wat I need right now!
Now I just need someone to buy me PhotoShop Elements... maybe I'll add that to my birthday list! Thanks for the easy to follow tutorials!
ReplyDeleteI'm so happy that Photoshop is doing the Ambassador thing and I love that all of you guys want to share this knowledge! Its fun to empower people and help them feel like they can do creative things! You rule.
ReplyDeleteAnd thanks for sharing the social media links for PS Ambassadors. Following and liking and all kinds of crazy things with them now : )
My Billie
This is great! SO excited for all your tutorials :) Keep 'em coming!!
ReplyDeleteEven though I know most of these things, It's always nice to have a refresher. Sometimes you forget things. I can't wait to see more tutorials!
ReplyDeleteAlso, it was super nice of you to include the html code box thingy. I remember when I first started my bog and I was looking for it, it took me forever to find it.
Awesome! This is so useful :-)
ReplyDeleteI would love to learn also how to make one side of the picture fade into a color I would choose. Not sure how it is called though.
You mean with a gradient added to it? If you send me an example I'll see if I can help you out xx
DeleteThis is really, really helpful for people trying to design a blog and are new to blogging. Can't wait to see more tutorials!
ReplyDeleteyou are so insanely awesome!
ReplyDeletethank you for posting this. i use photoshop, and i'm terrible at using it, bc i never took a college course or anything on it (what was i thinking??) anyways...i'll have to figure out the extra steps, but this gives me a nice framework...
thanks for sharing your technical skillzzzz! xx
If you ever have any questions, feel free to email me! It's fairly simple and I'd be happy to help you figure it out!
DeleteI've been wanting to do this! Thanks so much for the super simple tutorial!
ReplyDeleteThis is so cool and helpful, thank you so much for this tutorial!
ReplyDeleteThis inspired me to redo my entire blog look! However, I'm just having trouble with that box that displays code for the button. It doesn't seem to be working! Just ends up displaying the image twice.
ReplyDeleteI didn't even realize the post ate half of the HTML! It's fixed now! ;)
DeleteFab, fab, and more fab! Super stoked I found you and this particular post!! <3 Thank you so much!
ReplyDelete~Sacha
I am so psyched that you will be sharing little Photoshop tutorials with us!! =)
ReplyDeleteGreat tutorial! you made me want to redesign my blog :)
ReplyDeleteI want to suggest some additions:
1. A great picture that says what the outcome is and what is the tutorial (so I could pin in to pinterest without to much text to explain the picture)
2. A video? I found it hard to understand where were the buttons you were talking about.
Thank you for the great tutorial! Btw, love your blog! :)
ReplyDeleteI've been working on this for awhile now and everytime I save it as a PNG file, it still shows the white background. Any idea what I'm doing wrong?
ReplyDeleteWah keren postnya. ^^ Nice :)
ReplyDeleteBtw kunjung ke blogku ya
Bamudar - Tutorial Photoshop dan Coreldraw
Bamudar
Great tip!!
ReplyDeleteThank you!
It looks soooo much better, I'm going to try it.
Bella xx
Hi Kaelah, love your blog. How can I add a button for your blog on my blog? Do you have a code I can copy into the layout?? I have searched but can't seem to find it!
ReplyDeleteThanks
Peebreeks
http://peebreeks.blogspot.co.uk/
Hi darling! I used to have them on the sidebar but then I nixed them for extra space! If you want to email me (kaelahbee@gmail.com), I'd be happy to pop the code over to you! So very flattered at your inquiry! xo
DeleteYour site is amazing...thank you for this!
ReplyDeleteAs design today my office work but I don’t know this design. When I see your tutorial then I done my work. Thanks you so much..
ReplyDeleteYour site is very help for every Graphic design.Great tutorial, I found what i was looking for and this is gonna help me a lot.Thanks a lot to the Team and Best of luck for still more to come!!
ReplyDeleteYour blog site is fantastic.Thank you for the site....
ReplyDeletenice and helpful Photoshop tutorial.. thanks for sharing and step by step details
ReplyDeleteHello Kaelah
ReplyDeleteI'm a graphic designer and a marketer. I'm glad to seen your tutorial becuz it's help me professional work. Thanks
clipping path service
clipping path
color correctoin service
That is helpful post, thanks for share this.
ReplyDeleteClipping Path Service
Clipping Path Service
This is very helpful! Thanks for sharing this!! Great site!
ReplyDeleteVery useful and educative tutorials . I was searching such tutorials .
ReplyDeleteIts really very attractive, thanks for sharing information.
ReplyDeleteClipping Creations India | ecommerce image editing service