

Hello everyone! It's Emily from Life, etc here, and I'm so excited and happy for the chance to take over for the lovely Kaelah today while she preps for her wedding enjoys her honeymoon!
Today I'm excited to share a really fun and easy DIY with you that not only is cute and creative, but is the prefect accessory for fall now that we're all wearing our hair out more often :)
I'm all about speed, ease, and thrift when it comes to DIYs, and this one is no exception because not only do I take the step-by-step approach, but it's made using simple items you probably already have in your home, and it took about 7 1/2 minutes to make!! Just the way I like it. haha. You can easily follow using just the pictures, but some people prefer the dirty details, so now everyone's happy! Okay here we go!
Supplies:
- tape measure
- hot glue gun + glue
- scissors
- plastic headband
- dum-dum (for nourishment)

Step #1: Cut the first end of your tape measure off at the 4" line, and the opposite end off at the 59" line. Glue both ends together overlapping 1 inch, putting the 9 next to the 3, to make the whole thing about 6 inches long.

Step #2: Starting from the 59" mark on your tape measure, begin gluing to your plastic headband by leaving 1" of space on the end to wrap around the end and glue to itself.
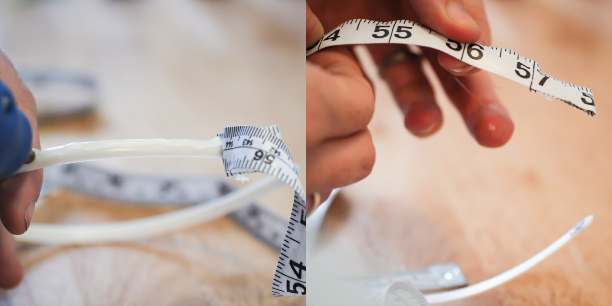
Step #3: Add glue to about 1/3 of the headband and carefully apply the tape measure to the hot glue (don't burn yourself!). Once you reach the other side clip off the tape measure leaving 1" and wrap it around and glue to itself.

Step #4: Cut a length of your tape measure from the 4 inch mark where you made your first cut, to the 13" mark. it will be 9" long. Glue the ends together overlapping 1/2 inch and forming a loop. Pinch the center of your loop together and secure with more hot glue. set aside
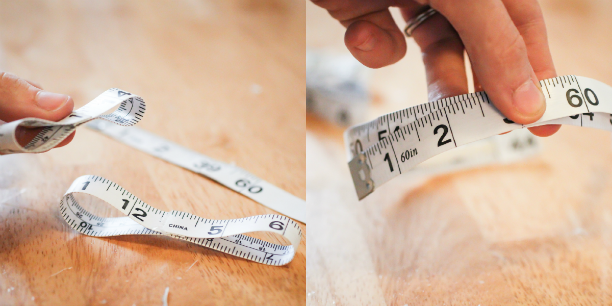
Step #5: Cut another length of your tape measure, only this time cut it six inches from your last cut. (from the 13" mark to the 19" mark.) Repeat the process of gluing the ends together 1/2 inch and then forming a little bow and gluing it together in the middle.

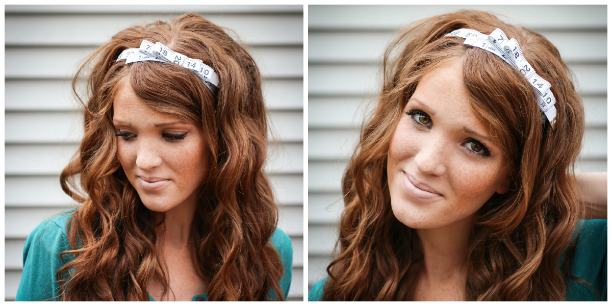
Step #6: Place your 6" long strip to wherever you want your bow on your headband and secure with your hot glue. Place your biggest big bow over the top and glue, then your smaller bow on top of that, and glue!
Step #7: Last but not least you're going to cut a little 1 1/2 inch piece of your measuring tape and wrap around the middle of your bow and headband, securing with hot glue. and you're all done!
There you have it! I hope you've enjoyed this fun little tutorial, and if you give it a try I'd love to see pictures! Again I just really love to be thorough in my instructions, so don't be intimidated by all the steps and pictures, it really was so fast and easy!
I'm so grateful to Kaelah for letting me share this with you today, and I hope you all decide to make a headband of your own! xoxo


No offense but she looks like she's smelling something awful in those pictures. Her blog link bar looks exactly like yours and her profile stuff on the left. She's trying too hard in my opinion.
ReplyDeleteThis comment has been removed by the author.
DeleteI think she looks lovely and is sharing a great DIY that I'm going to try. and Her bar looks wonderful :)
DeleteNo need for negativity here.
xo
i'm really embarrassed that i didn't even read the comments as i approved the moderation, therefore let this one through. i appreciate all comments on my blog, regardless of whether or not they are in line with my own, as long as they're not hateful. and to be quite honest, your comment was very spiteful. it's a wonderful DIY, otherwise i wouldn't have shared it. please try to keep the comments constructive. i normally would just delete something malicious but since it's garnered the attention of others already, i felt it best to acknowledge the post.
Deletefor everyone else commenting on the diy, if you try it out, please share with me as well :) i'd love to see them
Well put Kaelah and Nicole! I thin kshe looks adorable in these pictures and I'm definitely going to try out the DIY! For some reason, the headband makes me think of Alice in Wonderland!
Deletexx
Well put Kaelah and Nicole! I think she looks adorable in the pictures! I am definitely going to try out the DIY too - for some reason it reminds me of Alice In Wonderland.
Deletexx
thank you ladies! I admit to not reading the comments until just now and was also shocked at the rash judgement.
DeleteI poke fun of the pouty 'Zoolander' face I'm making in the top picture, but the post really isn't about me and I always think that if I can't say something nice then I shouldn't say anything at all.
Kaelah is one of the most lovely and inspiring women I have ever come across, and it is the biggest honor to have a guest post on her blog!
Thank you again Kaelah, thanks for the love ladies, and have a great day!
xo, Emily
Hi, love the hairband, defiantly going to have to give this one a go. Hope your having a lovely day. Lian XX
ReplyDeletehttp://ilovesixpence.blogspot.co.uk/
ohmygosh, cutest idea i've seen in a long time.
ReplyDeleteand a great excuse to buy dumdums ;)
such a cute idea!
ReplyDeleteAn Apple A Day. Why would you be hateful to someone doing what they enjoy? It's really mean to post negative comments about someone in a public forum. I'm sure you didn't mean to attack, right?? This blog is about happy creative things. Lets stick to happy comments. Great tutorial! I can't wait to try it out!
ReplyDeleteOh this is super cute! Great idea for last minute gifts too! :) Thanks bunches Emily! & Kaelah...hope you guys are having so much fun!
ReplyDeletexo
What a sweet idea. Can you make it with ribbon too?
ReplyDelete-Lindsey
Very cute DIY!
ReplyDeleteI work in a fabric store and I am going to make one! Great idea Emily.
ReplyDeleteLoving the headband, great job it's so cute.
ReplyDeleteThat is a really neat idea. Looks great on you!
ReplyDeletei think the diy is really cute :) great job, emily. xx
ReplyDeleteSo pretty!!!
ReplyDeletexo Heather
http://ahopelessnotebook.blogspot.com/
She is gorgeous! Loving this DIY too :)
ReplyDeletegreat idea, nice tutorial :)
ReplyDeletethat's a pretty brilliant idea! looks so cute! :)
ReplyDeleteWhat a sweet idea. Must (!) check out her blog now!
ReplyDeleteI love Emily and all her tutorials!! I'll try this one and write a post about it!! thank you for sharing!!
ReplyDeletexoxo
Luisa
labellemadeleine.blogspot.com
Oh what a cute idea - I love this!!
ReplyDeleteNow if only there was a way to make this so that I could easily remove it from my head, measure something, then replace perfectly in my hair! That would be AWESOME!
ReplyDeleteshe is so pretty and i LOVE this diy - it's a really cute itea to do it with the measuring tape.
ReplyDelete<3 katherine
of corgis and cocktails
such a cute idea!
ReplyDeleteJust want to say a belated congrats on your wedding! Looking forward to seeing all the pics :) x
ReplyDeleteLove the hairband! This DIY is adorable! <3
ReplyDelete