

this is what you don't want it to look like!
First up, we need to determine what pixel area we're working with in our content area. The content area is the space where your blog entries show up. Generally to the side of, or in between your side panels. If you have a Mac, you can do a Shift+Apple+4 and "measure" the pixel width of this area to get a general idea. I'm working with a 490px content area. I know this by going to Dashboard --> Design --> Edit HTML and searching for "#main-wrapper" and it should tell you the pixel amount. (If your layout doesn't have this CSS in it, leave a comment below and I'll be happy to measure your layout for you! Just be sure to check back to see the answer and measurement!) You can also skip the measurement all together and just play around with a width number in your Blogger update. (For example, start with width=400 and if it's too skinny, go 450. if it's too wide, go 375. Play with it until you get a width that you think looks attractive!)
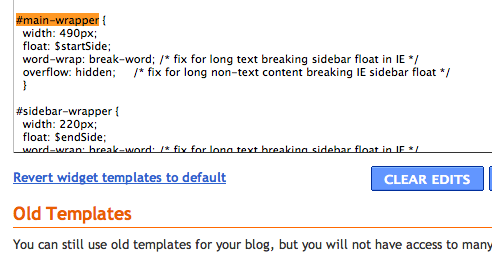
it should look something like this
Now that you know that, we can move on! I don't suggest hosting your photos with Blogger. AKA Don't start writing your entry and then use the little landscape button up there in the text editor to upload a photo. Why do I say this? Blogger compresses your photos and makes them grainy. Blogger also chooses preset sizes for "Small/Medium/Large" You can edit them, but they will be grainy.
I suggest using a third party host such as Photobucket to host your files. (I know many will disagree with me, and even I did myself not long ago, but Photobucket is a great resource for someone who doesn't need a professional/ton amount of space and it's free. Even if you need unlimited bandwidth, it's like $2-$3 a month! Flickr is also a good alternative but unless you're a bit more familiar with coding, it can get a tad bit trickier! There are several more steps involved with Flickr. (So for the sake of this tutorial, we're using Photobucket.com!) You can use any hosting site that gives you a direct link! For example, ImageShack, TinyPic, etc!
Now upload your photos! When you hover over the picture you want to select, the Direct Link will be copyable. Copy it and head over to your "New Post" page on Blogger.

Write up your post as normal and then find the places you want to place the pictures. Copy and paste this code below to put in *each* spot for the photo! ** Be sure to change the "490" number to the size of YOUR content area! If you want to give it a little padding, reduce it by 5 pixels and center the image! Be sure to delete the asteriks before using! **
<*img src="Direct Link URL Here" width="490" alt="Description of Photo"*>
* The ALT tag sends this message to Google/search engines when people are looking for something specific. If I tagged mine "Kaelah Bee Honeybee Outfit" then my photos would show up when someone Googled "Kaelah Bee". If you blog a rad recipe then add that description! You've got new readers just waiting to find you! The alt tag is completely optional!
* The reason we use "width" tag and not a "height" one or both is because your browser will automatically resize your image proportionally to fit the area and since we're more concerned with them lining up width-wise, that is all we take into consideration!
If you follow these short handy tips then your layout is for sure going to look like a million bucks!
A Few More Photo Tips...
* When editing your photos, make sure the file size is 72 dpi and not 300! This will help with layout loading time!
*Change up the composition by putting two photos side by side in the space of one! This helps break up the monotony of really big pictures!
*If you'd like to make your photo a clickable link (for a click-through source) then use this code below: (just remember to remove those pesky asteriks!)
<*a href="URL to Page/Source Here"><*img src="Direct Link URL Here" width="490" alt="Description of Photo"*><*/a>
Overall you should just use your blog to expand your knowledge of everything! Don't feel resigned to having something on your layout that you don't like. It should be an inspiring place that you love to contribute to, and it should be an aesthetically pleasing place for your readers to encourage them to stay a little while. If you don't know how to do something, Google it! I'm graduated with a BFA and I still have to Google certain things!
PS: I really wasn't sure how "easy" to make this so if you have questions, please chime in in the comments below! I'll be happy to try and answer those! Just be sure to check back every so often! Happy Blogging!


This is great! Every time I post photos on my blog I have a hard time getting them to fit properly and even when I do they ALWAYS lose resolution! One thing that I have had a problem with though is the width of my content. My layout doesn't seem to have a "main wrapper" part to it. Im sure it has that but it isnt called that so idk how to find it. I might have found it once, but when I changed it, it moved everything over a little and makes my pictures not be able to be aligned in the center. To help me out a little do you think you could post a link or something to the layout you have or one like it? I think it would be so much easier if I had the main wrapper text that I could just mess with.
ReplyDeleteThat was so much longer than intended. Your help would be greatly appreciated!
great post thanks kaelah! would iphoto work as a suitable alternative to photobucket or flickr?
ReplyDeletex
@ Lauren: your wrapper is the same as mine! 490 pixels :)
ReplyDelete@Rosie: I've never used iPhoto as a source of hosting but if it gives you a direct link like shown, then absolutely!
ReplyDeleteThank you! It LOOKED the same to me, but my photos never looked quite as large as yours and probably because I was uploading them with blogger, ha! Really though thanks so much for this :D
ReplyDeleteThank you so much! it really is nice when an experienced blogger helps out the begginers out there, so thank you!!!
ReplyDeleteoh thank you so much for this! big help! I'm relatively new to the blog world and blog design and layouts etc go right over my head, and i used to think myself good "at computers" ha. x
ReplyDeleteGreat post i hate how i can never make my photos the same size. I'm stuck in the middle of an essay at the moment but when I can i will have a go! Thank you so much
ReplyDeletexx
Thanks for sharing this! I had no idea blogger compresses photos. I did notice the graininess but didn't think it was blogger. Definitely going to use these tips! Awesome post. :)
ReplyDeleteGyaah - You are a dream! Thanks so much for posting this! I'm hoping to have my blog designed as a birthday present to myself come August, but in the meantime these tips will be so incredibly helpful!
ReplyDeletethis is way easier than what i've been doing! thanks kaelah! XO
ReplyDeletethanks so much for this! i have been scowering the internet trying to find ways to improve the layout, but everytime someone talks about editing HTML I have no idea what they're talking about! i'm not very computer savvy! this was really easy to understand! i'm going to go work on it now!
ReplyDeletehaha wow where was this about two months ago when I first started my blog??! I love your blog so much. I feel like everything I want to hear it right here! I've only been blogging for about 2 months now and I searched online for what seemed like a week before I firgured out how to do this! I was ashamed of my blog when I had tiny mismatched pictures haha. I'm still working on my layout, but hopefully I learn some new things. Your layout is perfection!!
ReplyDeletethanks SO MUCH!...i've been so frustrated with my pics...always wondering why my photos don't get any bigger, even when i changed their size in a photo editing software.
ReplyDeletei have no idea what i'm doing with blog design, but things like this make me feel like i'll get there someday:)
this is great!...you're the BEST:)...and i changed two posts pic sizes...WOW, what a difference!
xo
Haha! I'm totally guilty of inconsistent dimensions! A good friend shared this post, and I'm glad I checked it out:) Thanks for the walk-through!
ReplyDeletehi that has really helped. could you measure mine for me.
ReplyDeletethanks xx
@ EmmaC+M: Looks like you're about 615 so I'd do photos at about 610 or 612 and center them :)
ReplyDeleteThis is such awesome information and advice! I honestly did not know ANY of this jazz. I've always used blogger's picture uploader and I've always hated it! Ha. I didn't know there was ANOTHER way. Woo hoo! Thanks Kaelah dear. You rock my socks! :)
ReplyDeleteomg i hate photos on my blog!!!!! please help me change it and measure it!
ReplyDeletethanks a lot!!!
xxxx
Agnes
http://marysza.blogspot.com/
Another fantastic post! I always make sure my photos are the same width (I have a little thing about it like you!) but to date I have just been going to HTML view and changing the width to what I want, and then guessing the appropriate height! And through trial and error I work out a rough height that makes my photos look back to normal. Not the best method haha, so your HTML code will be very useful for me! x
ReplyDeletethis is an awesome post! i've been trying to keep my photos streamlined and even because i just don't like it when they aren't! haha. :] ♥
ReplyDeleteI'm having trouble measuring mine, your help would be greatly appreciated! : )
ReplyDeletethanks, ardiana
http://asmalltowncupcake.blogspot.com
@Marysza / Agnes: You're at 475 pixels wide!
ReplyDelete@Ardiana: You're at 490 like me :)
haha, I love this post. I rarely take vertical pictures as they don't look pretty on my blog. I love this so much as it's something I've never thought of. I just need a day where I have some time to get my head around this properly and then I can have a pretty blog too. I'm so excited. x
ReplyDeleteWow! Great information. Very useful, so glad I read this!
ReplyDeleteThank you :)
-Jessica
This has just helped me immensley. Thanks!
ReplyDeleteOh, fantastic! Thanks for the help. I definitely plan on trying these tips out, thanks!
ReplyDeleteThankyou so much, i just had a play and managed to do those perfectly, i cant wait to do my next post with my new fandangled photos!
ReplyDeleteRachel
xoxo
http://procrastinatingrachel.blogspot.com/
thanks you so much the difference. is amazing. xx
ReplyDeleteThanks so much this is so helpful, Ive not long started putting all my pictures the same size and my hard drive is filling up, because i keep the original file and then the edited version and it was all getting a bit messy!
ReplyDeleteI'm tempted too, to go through my old photos and fix them =] hehe
Thanks! x
Is it terrible that I never thought about this? And that I had no idea you could do anything OTHER than upload photos through Blogger?!
ReplyDeleteI've learned a lot today :) Thanks for this amazing tutorial!
Hi Kaelah is there any chance you could link to the post that you screencapped? Dying to see those photos up close! :)
ReplyDelete@Emma: http://honeybeeinthecity.blogspot.com/2009/08/wedding.html
ReplyDeleteThank you! :D
ReplyDeleteThank you so much for this! I've been having so much problem with the quality of my pictures but I couldn't get them the right size using Flickr, switching to PhotoBucket and this tutorial has made such a difference (I did a test on one of my previous entries and it made such a difference), thanks so much!
ReplyDeleteI have another little question - do you know if there is a way to add to the HTML code that you want the picture centred or to the right or left? I used your method and it worked amazingly well (thank you!!!) but my pictures were aligned with the very left of my text, rather than being centred under my text (I like my pics slightly less wide than my text). I guess it's not a big deal and I could solve it by making my text and photos the same size and using up the whole wrapper space! my blog is here: http://givemebows.blogspot.com/
ReplyDeletethanks again for the fab tutorial!
Thank you! for this I hated having images different sizes, I'm totally going to go edit through my blog now.
ReplyDeleteThanks for the info this is great! I have scoured my HTML and can't for the life of me find the main wrapper so if you wouldn't mind measuring for me I will love you forever! Thanks so much sweet girl!
ReplyDeletecookielouisepleaze.blogspot.com
Hey Kaelah, thanks so much for this. I used it for my blog post today and it looks SOOOOO much better than my previous posts. :)
ReplyDeletexx
Mae
Score! Can't wait to try this out on a few my recent posts. Going to be a lot of work to re-do all of my blog entries, but this post was just what I've been looking for. Thank you, thank you, thank you!!
ReplyDelete@PinkPenguin: Just highlight the code (or the picture) in compose mode and hit the text align center button in the top menu of the entry. It'll center it for you :) it can get tricky to do it via html because some recognize certain tags and others don't! this way is just easier to tell you :)
ReplyDelete@ Christina: Yours is also 490 :)
Hi Kaelah! This such a great tutorial, but for some reason I am still struggling - html always sort of confuses me. : )
ReplyDeleteCan you help me figure out my column width for starters?
Thank you!
xo,
Sarah
Sarah Nicole: no problem, mama! you're working with a nice big ol' 710 pixels! photos on your blog look SO good! LOVE that size! xo
ReplyDeleteYou are awesome for posting this. I'm guilty of uploading photos through blogger because I wasn't sure how to do it otherwise... now I know! :)
ReplyDeleteThank you so much Kaelah!
ReplyDeleteI swear by Flickr, so would you be able to post the extra steps?
THANK YOU KAELAH! This is something that has driven me NUTS about Blogger for so long! I'm tempted to go back through my whole blog and resize all my pics. :D
ReplyDeleteLCH...thank's so much, you are awesome for taking the time to help out your readers!
ReplyDeletehey, I know this is an old post but please can you measure mine? I cat find it in my HTML...
ReplyDeleteThanks so much for this, Kaelah! it was bugging me that my photos looked so tiny and not uniform, but now it's so much better!
ReplyDeleteMy CSS doesn't seem to have the main wrapper thing, so I can't figure out the measurements.
ReplyDeletePlease help!
This is fantastic! I have gone through old posts and edited them and I amazed how much better it looks!
ReplyDeletethanks
I just came across this post, when googling how to get my photos and posts the same width. Sort of awesome since I love your blog! Anyway, I cannot seem to find the width of my blog. Is there any way you could measure it for me?
ReplyDeleteThank you so much for this post! I am desperately trying to learn how to use html to make things better. One question- on blogger, my pictures have a slight board and padding so when trying to make 2 pictures sit on one line, how to I make sure that they are the total width I want? I am using width 650 for my content, but 325 each makes the two wider than a single picture because of the padding. Is it just a case of guesswork? Thank you, I know you're snowed under right now
ReplyDeletexxx
Can you do it for me? I can't find the #main-wrapper?
ReplyDeleteHello! :) Great tutorial and easy to understand! However, using HTML to resize images is a huge no-no. There's a ton of reading on the subject, but here's one decent explanation:
ReplyDeletehttp://graphicssoft.about.com/od/aboutgraphics/l/blresizehtml.htm
But I totally understand that non-developers will still be doing it anyways hehe. ;)
Thank you! I love this! I didn't realize that Blogger did make my photos grainy! I thought it was my camera, but I noticed that initially when I would look at my photos they were nice. I have bad eyes, so that's what I would always blame it on!-Jessica
ReplyDeleteThis is really helpful!, although I am still unsure of how to measure the area, would you be able to do this for me then I literally take the code for my image and resize it? As I have been resizing/fiddling around with images and anything I've done so far looks a bit messy! Thankyou for your help if you are able to measure the area on my blog for me :):)
ReplyDeletexoxo Fee
sophie-mayanne.blogspot.co.uk
This comment has been removed by the author.
ReplyDeleteThanks so much for this! I'm glad I was told how to fix it quickly or my OCD would have gone crazy! Do you think you'll be doing any more blogging tutorial posts? Because I'd really love that! Also, I was wondering if you could tell me how to make my header/other layout graphics not so grainy. I used this tutorial with the graphics, but they still seem grainy to me. I might just be incredibly nit-picky though.. Thanks again!
ReplyDeleteI know this post is old... but do you have a code for putting photos side by side? I used the code above for sizing my photos and found a random html code online for side by side pics, but they don't match up (even with adjusting width).
ReplyDeleteWhat do you use for each post?
Thanks!
Rachel
http://www.postcardsfromrachel.com
Without this, I don't know how I would have ever figured this out. I've wanted to start a blog for several years now, and I took the plunge and got Elizabeth of Delightfully Tacky to design one for me. Then came the hard part...everything else!! I had no idea that all of the blogs that I love so much involved so much work!! Seriously, without you I would have thrown in the towel on the very first try. Now I just need to figure out things like what size/format should I take my pics in (the canon eos rebel has so many options...), what format I should save my edited pics in (I used jpeg..) and exactly how photoshop actions would work if I bought them....
ReplyDeletemuch-too-many.blogspot.com
Hi, Can you help me with my blog, please?
ReplyDeletehttp://snb-me.blogspot.com.es/
Hi, I'm having real trouble with my tumblr and the pics being staggered. My link is http://sticksnstonesmydear.tumblr.com/.
ReplyDeleteThanks for the help ^_^
Superb blog! Do you have any helpful hints for aspiring writers?
ReplyDeleteI'm planning to start my own blog soon but I'm a little lost
on everything. Would you propose starting with a free platform like
Wordpress or go for a paid option? There are so many choices out there that I'm totally confused .. Any recommendations? Thanks!
Also see my webpage :: nfljerseysfreeshippings.com
magnificent points altogether, you simply received a
ReplyDeletelogo new reader. What would you recommend
about your publish that you simply made some days ago?
Any positive?
Review my web-site ; mustreads.info
It is really a nice and helpful piece of information. I'm glad that you simply shared this useful info with us. Please keep us informed like this. Thanks for sharing.
ReplyDeleteCheck out my blog ; christian louboutin sale
Breathing a sigh of relief! Everywhere I looked, my photos were fine. Except Blogger, of course. Thank you so much - the way you've described the problem and the remedy is very clear.
ReplyDeleteThanks so much!
Emma from Pretty Tasty (emmabennetto.blogspot.com.au)
So happy that you included instrux for Mac! I'm slated to post to a team blog this week, and wanted to make it look better than last week's post! *sigh. The bane of being---like you---a graphic designer!
ReplyDeleteAh I feel so stupid-I'm a complete moron when it comes to any of this technical stuff....can you help me figure out the size of my blog's wrapper? Thanks so much!
ReplyDeletehttp://sequinsandpolkadots.blogspot.com/
我們的公司幫助任何形式的助學項目。此優惠感興趣的是誰,請與我聯繫,我會告訴更多的細節。论文网站
ReplyDeleteHi! I read your post and I really find it informative. I was just wondering, what if I am using flickr as my hosting site? I already have a flickr account but I don't know how to encode my photos from flickr to blogger. Flickr doesn't seem to have a direct link on their photos
ReplyDeleteThis comment has been removed by the author.
ReplyDeleteThis comment has been removed by the author.
ReplyDeleteI'm not sure what I am doing wrong. When I copy the URL you have given to get your photo into blogger using the direct link from photobucket (filling in the blank bits with my info) nothing happens. When I press preview it just shows the link printed, no photo :(.
ReplyDeleteAny help on what I am doing wrong would be great, thank you :)
swirledtogether@gmail.com
swirliciousbeauty.blogspot.com
You probably need to enter the HTML in the "edit html" tab instead of "compose" - once you've got the photos coded in, switch to compose and they'll show up. Blogger does it a little different on each blog it seems, but that should fix it!
DeleteHi, I tried out your link & when I pasted it to my Blogger's html & insert the Photobucket's direct link, the photo kept show the original size, even thou I tried to amend the 490px. I also couldn't locate my wrapper's size. It's weird that when I returned back to my "compose" page, I saw bits of the html code. I've quite a number of photos to post, is it that I will need to manual adjust for each photo (no faster way?)
ReplyDeleteI would be grateful if you could help me pinpoint the issue. Thank you in advance.
kesteraemon.blogspot.com
kesterchan38@hotmail.com
Hi there! This post is very helpful! I HATE how my photos all look super grainy when I upload them now. :/ (I swear it didn't use to be like this :( I don't know what happened...) I was just wondering if you do this for each and every photo you upload though. Thanks!
ReplyDeleteThis was SO helpful. Thank you so much. I'm on my way to having a way better blog now :)
ReplyDeleteTHANK YOU! This is so helpful!
ReplyDeleteSo... for some reason, the html code just does not work with my blogger. And not just this html, but any html. And yes, I deleted the *. Am I doing something wrong?
ReplyDeleteYou need to add it in "HTML" view, not "Compose" :)
DeleteI'm so glad I found this tutorial! For the longest time, I was manually adding html to each line of my blog post to get the width of my post text to not exceed the width of my photos. I got tired of doing this after a while and stopped. Now the alignment is driving me nuts! When I go to edit html, for my main-wrapper it says 200px, which seems odd to me, because I know my post width is atleast 600+. Do you have any suggestions?
ReplyDeleteThis treamlining photo size tutorial was brilliant. Thanks!!
ReplyDeleteHi there! Thanks so much for this tutorial. I've tried to add your code to my blog using Photobucket to host my pictures. I've been having trouble with pictures stretching on my blog when I upload them to blogger. When I used your code, it just shows up as the code on my blog page, not the picture. Am I doing something wrong? Here's what I used (without the asterisks):
ReplyDelete<*img src="http://i1264.photobucket.com/albums/jj485/natasha_red7/14c29df8-241e-4663-8e19-920d3e467d07_zpsf035c341.jpg" width="680" alt="gather around our table"*>
Thank you!
You need to add the code in "HTML" view, not in "Compose" :)
DeleteYou may have a piece of code somewhere on your blog that determines the width of your photos already, so just be sure that 680 is the correct number for your content area!
Thanks for you great posts! Not sure if you are still answering these but I am using Foodie Pro and I cannot get my pictures to be large and not grainy. I went into the HTML text and changed the size and matched that size to the picture size I created in Canva, what else am I doing wrong? Thanks!
ReplyDelete