
I'm a last minute gift giver. Without fail, I'm always rushing around on Christmas Eve trying to finalize gifts whether they're store bought or handmade. I'm notoriously bad about procrastinating. This year I am totally on the ball though. I'm not sure what happened, but a switch was flipped and now I'm pretty close to being done all together! Yeah, it's crazy. I usually feel pretty bummed that I wait so long to finish my gifting because 9 times out of 10 I just grab something at the store and run with it. I really strive for my gifts to be intentional and well thought out, but sometimes that just doesn't happen. The December Michaels Makers challenge is all about "holiday hacks" and creative solutions to the bevy of problems thrown our way. I could say that I'm just too busy to get my gifts in order, but the truth is I'm usually just stumped. However, I totally have a solution for you (if you're like me!) Instead of grabbing the nearest "thing" off the closest shelf, try your hand at one of these quick and simple last-minute DIY gifts! No gift on this list takes more than 30 minutes of actual crafting. In fact, most of them are 15 minutes or less. THAT is my kind of craft! And there's something for everyone, so enjoy!

Create your own: Create your design in Cricut Design Space. Cut out the design on the vinyl. Use Cricut Transfer Tape to transfer the design from the vinyl backing to the sign. Once the vinyl is adhered to the sign, do a quick coat of white paint over the entire sign. (We were very willy nilly with it because we wanted to retain that rustic look) Let the sign dry for about 30 minutes before pulling up the vinyl pieces. Voila! A new sign to hang in your home!
Create your own: I grabbed two of these little chalkboard signs from Michaels and then painted some stain on the framed edges (I used Dark Walnut). Then I used a paint pen to doodle some verbiage. (You can use chalk markers, but they're notoriously watery and thin. I like the opaque look of the paint!) Be sure to create a set so they can have one on the front and back door!

Create your own: Grab a plain tee at the store (Michaels has a great selection of youth and adult tees. If you want something for a toddler or infant, you'll have to pick it up elsewhere!) and pick out your favorite iron-on vinyl for your diecutting machine. Cut the design out in Cricut Design Space (be sure to flip it since it's an iron on!) and then weed the excess vinyl off of the transfer plastic. Once you've got your design ready, heat up your iron and get busy! You'll be amazed at how quickly the vinyl adheres to your shirt. And just like that you have a new, fun tee!

And because I whipped up the easiest little note board for our kitchen, I figured it's worth sharing here, too. I mean, we are talking about last minute DIYs right?! This menu board is just a wooden plank from Michaels with a bulldog clip attached with E-6000! It sometimes holds our weekly menu, and sometimes it holds photos, drawings Toby has made, or important notes that I'm destined to forget! I know, it's so simple it shouldn't even be considered a DIY. (But I did do it myself so there!)
Overall I love all four projects. They're fun and easy and totally awesome in their own way. I'd be stoked to receive any of them! Hopefully you'll find something to inspire you! If you're still on the prowl for the perfect DIY gift, or you need help with another holiday hack, check out the other Michaels Makers on The Glue String. You can also check out some holiday project ideas and instructions on Michaels.com (including gift wrapping, home decor, hostess gifts, etc!)
Let me know if you see anything you like! Or if you have any fun DIY gifts planned!
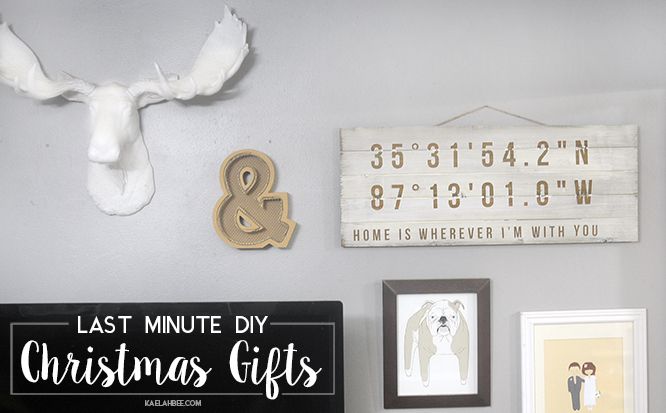
Latitude / Longitude Wooden Sign
You can see a full-frame shot of this sign in context at the very top of the post. I wanted to create something fun and rustic for our living room, but I also wanted it to be sentimental. I opted to look up the coordinates for the farm where Mike and I got married in 2012, and then this sign was born! I picked up this wooden pallet plank sign at Michaels and then I loaded up on some vinyl for my Cricut Explore. I picked up some white acrylic paint and a big paintbrush, too. That's literally all that is needed for this sign!Create your own: Create your design in Cricut Design Space. Cut out the design on the vinyl. Use Cricut Transfer Tape to transfer the design from the vinyl backing to the sign. Once the vinyl is adhered to the sign, do a quick coat of white paint over the entire sign. (We were very willy nilly with it because we wanted to retain that rustic look) Let the sign dry for about 30 minutes before pulling up the vinyl pieces. Voila! A new sign to hang in your home!
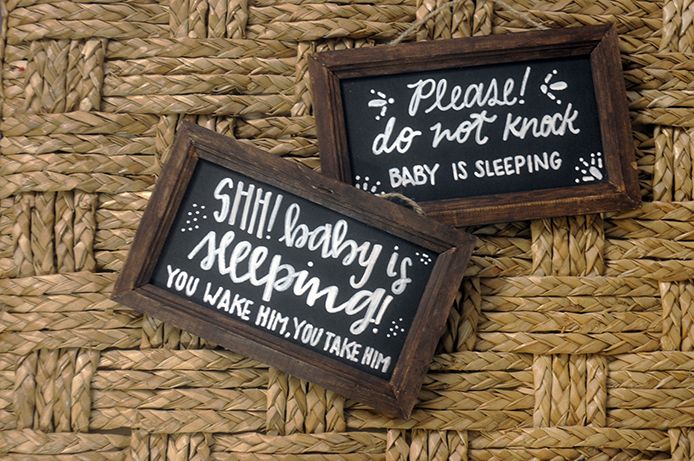
Do Not Disturb Door Signs
Do you know someone who just brought home a new baby (or is about to)? These signs will be the perfect addition to their doors! I used to think that putting a sign like this on my door would make me look... eh... unfriendly? But then I had a baby and I cursed many'a mailmen. In fact, the very day I put a sign on our door, it saved me from three separate solicitors. In fact, you don't even need a baby to utilize these! Maybe you're like me and you also just hate answering the door. Whatever the case may be, some cute "handmade" signs may just be the perfect gift for someone you know!Create your own: I grabbed two of these little chalkboard signs from Michaels and then painted some stain on the framed edges (I used Dark Walnut). Then I used a paint pen to doodle some verbiage. (You can use chalk markers, but they're notoriously watery and thin. I like the opaque look of the paint!) Be sure to create a set so they can have one on the front and back door!
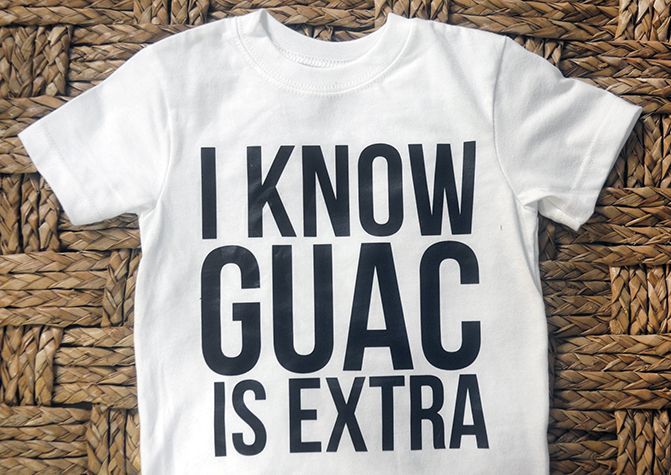
Silly Graphic Tees
I am obsessed with making shirts, y'all! Obsessed! I've been making some for Toby and Linden like crazy. We're basically Chipotle fiends in this house so a guac shirt was necessary! I made these matching shirts for the boys to wear and holy moly they look cute in them. These shirts took less than 10 minutes to make, start to finish! I utilized my trusty Cricut yet again for these. (Seriously, if you've been thinking about getting a Cricut, just do it! I love mine! I can't get enough!)Create your own: Grab a plain tee at the store (Michaels has a great selection of youth and adult tees. If you want something for a toddler or infant, you'll have to pick it up elsewhere!) and pick out your favorite iron-on vinyl for your diecutting machine. Cut the design out in Cricut Design Space (be sure to flip it since it's an iron on!) and then weed the excess vinyl off of the transfer plastic. Once you've got your design ready, heat up your iron and get busy! You'll be amazed at how quickly the vinyl adheres to your shirt. And just like that you have a new, fun tee!
And because I whipped up the easiest little note board for our kitchen, I figured it's worth sharing here, too. I mean, we are talking about last minute DIYs right?! This menu board is just a wooden plank from Michaels with a bulldog clip attached with E-6000! It sometimes holds our weekly menu, and sometimes it holds photos, drawings Toby has made, or important notes that I'm destined to forget! I know, it's so simple it shouldn't even be considered a DIY. (But I did do it myself so there!)
♥ ♥ ♥ ♥ ♥ ♥ ♥ ♥ ♥ ♥ ♥ ♥ ♥ ♥ ♥ ♥ ♥ ♥ ♥ ♥ ♥
Overall I love all four projects. They're fun and easy and totally awesome in their own way. I'd be stoked to receive any of them! Hopefully you'll find something to inspire you! If you're still on the prowl for the perfect DIY gift, or you need help with another holiday hack, check out the other Michaels Makers on The Glue String. You can also check out some holiday project ideas and instructions on Michaels.com (including gift wrapping, home decor, hostess gifts, etc!)
Let me know if you see anything you like! Or if you have any fun DIY gifts planned!
xo KB


you're so crafty KB!!!
ReplyDeletewww.wonderlandclothing.com
I love the baby signs! My brother and SIL are getting ready to welcome a sweet girl into the world, those would be perfect for them.
ReplyDeleteThese are all so cute Kaelah!!
ReplyDeleteWhat's GUAC?
ReplyDeleteNowadays a lot of great Christmas gifts you can buy on Amazon, I created my own Christmas gifts top http://www.christmasgiftstop.com/best-christmas-gifts-for-a-boyfriend/ which I'm sure helps you to buy best Christmas present for your second half.
ReplyDelete