Showing posts with label sister blog. Show all posts

Kaelah Bee on Paper


I received this amazing piece of work in the mail yesterday from one of my May sponsors, Krista of Saturated Canary! It was such a treat to open up my mailbox and find this sweet little print and a matching pocket mirror, too! (Will I be conceited if I fix my makeup in a mirror with my picture on it?! ;P haha) 

The characters Krista draws are adorable! I just love them so much and I was so so tickled when she wanted to draw one up of me! Ahh! She even included my favorite Jeffrey Campbell shoes! I love the animation of her illustrations!

You could win one, too! She's hosting a giveaway for a custom portrait over at her blog, Saturated Canary! She's such a sweet gal so even if you don't win, hit her up for a commission! They're darling! You can see some of her other work there, too!

Thanks Krista!

Sponsor Spotlight + Giveaway: Elle of Elle.MNOP!

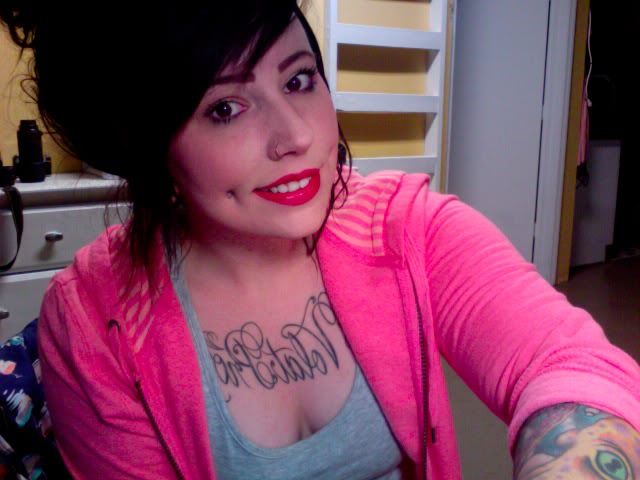
Today we've got our Extra Large sponsor (and my crafty gal pal), Elle from Elle.mnop indulging us with a sweet little interview and insights on her crafty life with her sweet pup and fella! I know several of you read Elle's blog already and I think all the rest of you should as well! It's a really fun and inspiring blog which will motivate you to break away from the computer and get your hands dirty! (Seriously... we made mosaic pots two nights this past week and we were covered in glue and grout! Dirty!)


Hi Elle! LCH is super tickled to have you as our Extra Large sponsor this month! I already know tons about you so how about you introduce yourself to the rest of the Honeybees? Tell us what makes you tick!
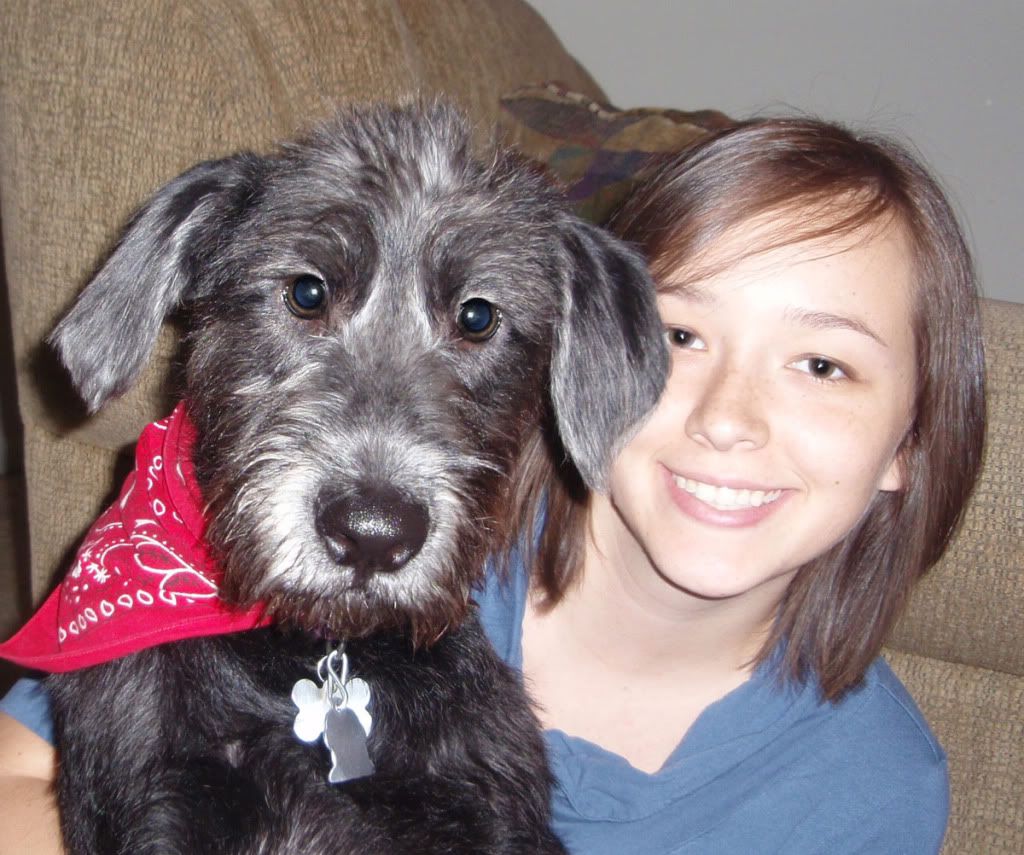
-Kaelah thanks again for letting me sponsor LCH this month I am so excited about it! Well for those of you that don't know me I have four loves in my life: my boyfriend Bryan, my awesome dog Riley, my career in web design, and of course crafting projects and creating things. I spend around 8-10 hours every day in the computer designing and as much as I love it it is very important to have a break from it at some point in the day. This is where the crafting comes in... There are many different ways to stay creative and inspired and as much as I love to look at other designer's work I get the most inspiration when I am creating and getting hands on with something.
So you write a blog called Elle.mnop… That's a super clever name! When did you start Elle.mnop and how did it come to fruition? What's the buzz all about?
- Well my name is Elle and at a serving job I had at Macaroni Grill everyone had nicknames and after many failed attempts of nicknaming me they came up with the nickname "lmnop" for me. At first I hated it and then I decided to embrace it and have loved it ever since! So when thinking of a blog name it just seemed right.

What are some things you hope to accomplish with your sweet blog?
-I have been blogging for almost a year now and I really love it! At first I mainly posted on online inspiration like artists and designs with a few craft projects sprinkled throughout. For the month of April I have done a craft project everyday and while its been challenging to complete sometimes I have loved how creative it has made me. For the future of Elle.mnop, I hope to continue to inspire people and create tons more projects that everyone can do.
Since you dove headfirst into blogging, what has been your favorite part of the experience? How about least favorite?
-My favorite part has got to be all the people I have meet in the process along with the great feedback. It makes me so excited to hear that people have actually tried some of the projects that I have created! My least favorite part was probably the beginning and starting it all. I found it to be hard to keep writing and creating for my blog when only a handful of people actually read it and it was mainly family. I am so glad I stayed with it though and didn't give up. Of course I want tons of people to read my blog but I had to learn to focus on the people that were actually reading it and keep them inspired.


What is a "typical day" in the life of Elle like?
-I am a hardcore multitasker so my days are pretty packed! I work at a web design firm in downtown Nashville from 9-6 and then head home to walk the dog. Walking the dog is actually my favorite part of the whole day because it lets me unwind and relax and of course get outside and walking around which I don't do much during the day. Next I try to cook a nice dinner for myself and Bryan but I'm still in the learning stages of cooking so sometimes its not so nice haha. The rest of my evening involves working out, creating, doing the next day's blog post, playing with the dog, and the occasional tv watching. Somehow I get it all done and don't sacrifice too much sleep which is always good!
Where do you find most of your inspiration? Do you read loads of other blogs to get the fire burning or do you find it in more unexpected places? 
-I read tons of blogs and normally have around 300 posts each day sitting in my Google Reader. I get a lot of my inspiration from fellow bloggers and designers but honestly most of my inspiration comes while driving. I drive an hour rounddtrip each day to work so I think a lot in the car. A lot of my craft projects come about from an idea while driving or a desire to recreate something with a twist on it.


What are some of your  daily reads that you can't get enough of?
- I of course read LCH everyday to find out what you are up too since I don't get to see you that much (sorry probably my fault) and I also love to read A Beautiful Mess, Design Sponge, Oh Joy, Turquoise Ink, the Martha Blog by Martha Stewart, and so so many more. One of my favorite things though is finding new blogs and new bloggers to get inspired by.
If you could just imagine awesome things into being, where would you see yourself in five years? What would you be doing?
-In five years I would love to see myself with a greeting card line in local boutiques along with options for custom invitations for weddings and baby announcements. I used to do illustrations for a shop in Murfreesboro, TN and I absolutely fell in love with how creative you could be and how much you could impact someone's special days. As much as I love web design, my dream has always been to own my own business so I would love to see myself working towards that goal in the next few years.

Any parting words of wisdom to the little honeybees looking to start their own blog or delve into a handmade life?
-I definitely recommend both to everyone! My main piece of advice would be to not focus on the number of people reading your blog but more enjoy writing it and just have fun! Write about things you want to and not just things you think people will read because your heart won't be into it then.

♥ ♥ ♥ ♥ ♥


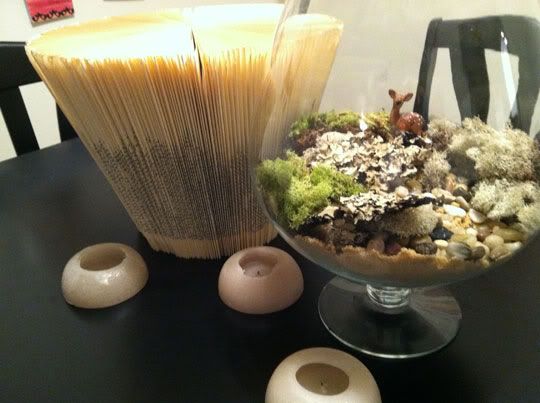
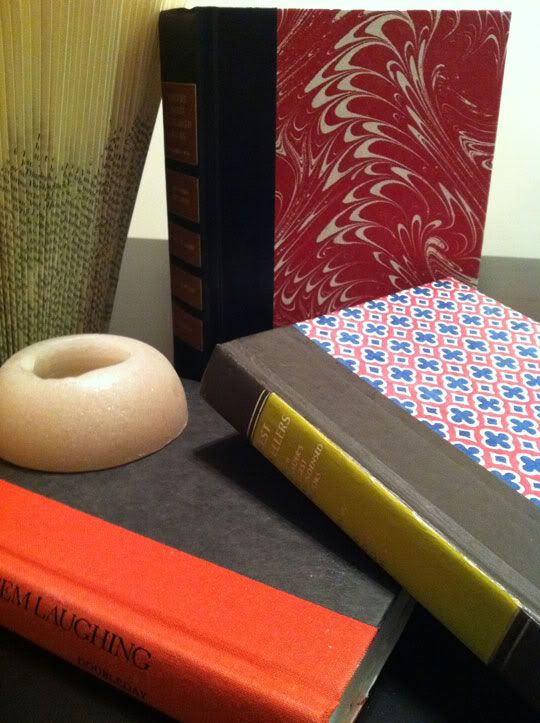
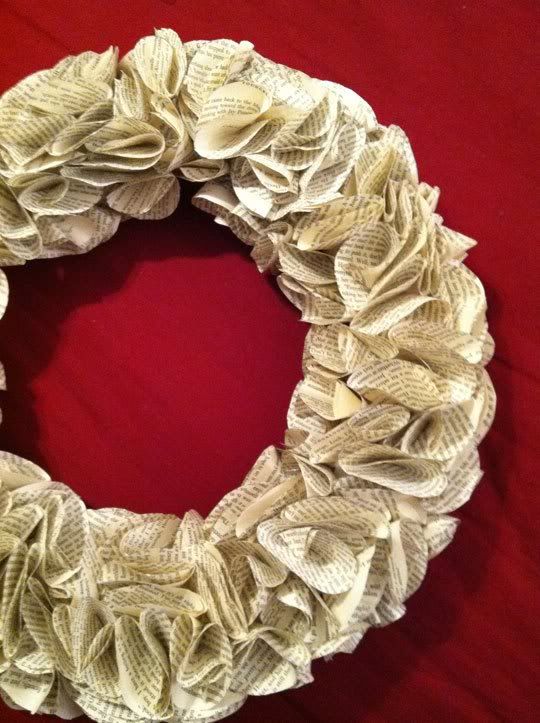
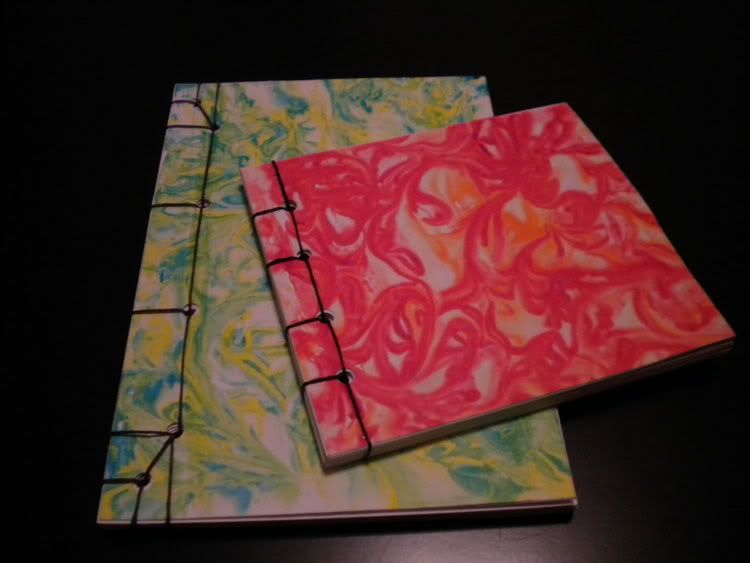
Elle is offering up a lucky winner two handmade journals with custom marbleized paper along with a hand sewn binding. If you don't win the giveaway you can find both of these DIY projects HERE and HERE!

All you gotta do to enter to win is visit Elle.mnop and leave a comment below!

You can earn extra entries by following her on Twitter and/or "Like" Elle.mnop on Facebook! Just leave a separate comment for each entry (up to 3 total)!


♥ ♥ ♥ ♥ ♥

Feelin' Fancy


I worked up the courage and confidence (finally!) to wear red lipstick the other day. I've kind of found myself a little bit obsessed with lipstick as of late but I normally gravitate toward very pale and pearly pinks. I wore it all day long, and even put it on again yesterday (in these pictures) just to feel fancy. I realized just how much of a pep it put in my step. It stands out, calls attention to you and basically says "OH HEY, I'M HERE! RED LIPS, Y'ALL!" haha I kid! But in all honesty, we each have that one little thing that we do to make ourselves feel special, right? Be it a certain dress, curling our hair, putting on our favorite hoodie to lounge around in (even though that seems so backward). Even when we have no intention of leaving the house, doing this little thing for ourselves can seem like a real treat. (Seriously, I'm wearing bright red lipstick with gym clothes and ratty gym hair! Can't get much classier than that! ;) haha)

So my question for you is...
What is your special little thing? What do you do for yourself to make you feel like a million bucks?


PS; My lovely friend Moorea wrote one of the most inspiring posts about growing up and being bullied. She challenged her readers to "Paint Your Love" and that means to paint your nails a different color to show that self expression is beautiful! Moorea has been a constant source of encouragement for me and she truly has a way with words. She's putting herself out there to relate to others. She's a total gem and I know you'll find inspiration and encouragement in her post!

PPS; My new fabulous red lipstick is L'oreal Infallible in Refined Ruby!

Connections: Susannah's New Feature!


Susannah came up with her new feature idea a couple of weeks ago and I was in love with it! Her feature is called Connections and it showcases blogger-made friendships which are larger than life. I'm super excited because the first installation of Connections features my friendship with Susannah and how we became to be so close. Susannah is without a doubt one of my very very best friends and I love her so much! It was fun to write about the past year and even more fun to read her answers (which I didn't get to see until today!) If you're at all interested in reading about our connection then pop on over to Susannah's blog to check it out! You can definitely look forward to other rad ladies writing about each other so keep your eyes peeled for that!

Guest Post: Katrina's Quinoa Salad Recipe!


Hi everyone! I'm Katrina from The Demure Muse! Thanks so much for having me over here at Little Chief Honeybee.


I can usually be found blogging about my daily outfits or jewelry making but today I'm here to share with you one of my most recent kitchen experiments. I hope you try it out this holiday season because I think the colors are perfect for the winter festivities!

Quick disclaimer: This whole recipe was an experiment between myself, a meatetarian, and my friend who has newly converted to being a vegetarian. If you’re like me and have never heard of quinoa prior to this, it’s a pseudo-cereal that is extremely nutritious and is often considered a vegetable substitute due to its nutritional value instead of a grain.

Vegetarian Quinoa Salad - serves 4

What you’ll need:
1. 2 cups of quinoa
2. 4 cups of vegetable broth (or a mix of vegetable broth and water)
3. 1 ½ cups of cherry tomatoes
4. carton of fresh basil (add as desired)
5. small block of feta cheese (or as much/little as you’d like!)


First, we need to wash the quinoa. You may notice that the water that the quinoa is being washed in will have a bit of a “soapy” feel. I did two rinses before cooking the quinoa.


Much like preparing rice, place a pot on the stove at medium to high heat with the vegetable broth in it. Once the broth comes to a boil, add the quinoa and put a lid on it. Remember to stir the quinoa every few minutes so that it doesn’t stick to the bottom of the pot. You’ll know when the quiona is ready because all of the broth gets boiled into the grains.

While the quinoa cooks, you can prep the rest of the ingredients for the salad. The great thing about making this salad is the fact that there is relatively little “‘cooking” involved! From here, halve the cherry tomatoes and chop the fresh basil. We want the basil to be in relatively big pieces.


Cut the feta cheese into about ½ inch cubes and then mix all of the fresh ingredients together in a separate bowl.


By this time, your quinoa should be well on its way to being fully cooked. We were a little impatient when we made this first batch of salad and we mixed all the ingredients in with the quinoa while it was still extremely hot, which melted the feta cheese. Depending on how you like your salad, it might be better to let to let the quinoa cool down a bit before mixing everything together.

Due to my meatetarian needs, I added a side of chicken. (I know, I know. I’m not the most supportive friend in terms of helping a newly converted vegetarian. I have a habit of forcing myself to have a balanced meal in terms of carbohydrates, vegetables, and proteins) I couldn't bring myself to have only a salad for dinner which is why I added the meat. I also added a small bed of spinach to my quinoa salad.


I hope you enjoyed the recipe! :)

--------------------------------------------------

Big thanks to Katrina for her awesome recipe! I can't wait to try it! You can stop by Katrina's blog or shop if you'd like to learn more about her!

Guest Post: Influence Holiday WishList!

Hi everyone, it’s Steph from Influence. I’m a twenty-one year old student from the UK and I’ve been blogging for a few months now just for fun. My blogs got a little bit of everything and is full of things that inspire me. I’m so excited that the festive period has finally arrived!! I love everything about this time of year from pretty fairy lights, chilly weather, snow, steaming cups of Starbucks gingerbread lattes, Christmas tree’s, Ice skating, quality time with loved ones, cheery music, woolly jumpers and furry boots (just to name a few reasons!!) I thought it would be fun to share with you all my Christmas wish list, have you started thinking of your own yet?


(1. Some wesc headphones 2. Hugo Boss Orange perfume 3. Some new nine west black boots 4. Hair products 5. Lush Christmas box selection 6. New socks 7. Some spending money.)


Every year I like to donate money to a charity. This year I’m going to donate to WSPA a well known charity who help stop cruelty to animals all around the world such as bears, working horses, factory farming, stray dogs, whaling etc. I think it’s important we spread awareness about these issues and show our support. It’s also a nice feeling to know you’ve made a difference in some person or animals life.

Thanks for reading my Christmas wish list everybody and I hope you all have a very merry and happy Christmas!! Love Steph x

Guest Post: SusannahBean DIY Retro Foil Wreath!

metallic diy wreath


I have a soft spot for cheesy Christmas decorations. I love tinsel and candy canes and elves, and if it looks like it came from the 1950s I’m all over it. That’s where the idea for this wreath came from. I wanted something with 50s style but a modern twist, and I wanted to reuse things I already had laying around my house. Thank you, Kaelah, for letting me share this with your readers!!


What you'll need:

  • One large (14”) Styrofoam wreath
  • One pack of ornaments (feel free to use any assortment of ornaments you have. It looks best if you have
  • different sizes)
  • One roll heavy duty tinfoil
  • Pins
  • Kitchen shears (or scissors, but they’ll need to be strong)
  • 3”x 3” square of cardstock (for a template, use any thick paper or cardboard)
  • Hot glue gun and glue sticks
  • (Optional): One 5-6” length of coordinating ribbon to use as a hanger, OR an over the door wreath hanger


Instructions:

Tear off a length of foil and fold it in half as many times as needed until you get a square pretty close in size to your template. It’s much quicker to cut the foil like this, that way you end up with a lot of squares!


You’ll want to separate the individual squares. Don’t worry if they tear a little bit, or if they aren’t perfect
squares. You’re just going to crumple them up anyway!

Take one square of tinfoil and wrap it loosely around the tip of your finger. Twist the center part of the square around and fold it back on itself. You need to make it thicker at the middle so it won’t rip when you pin it to your wreath, so as long as you can make a little thick spot you’re doing good!


Insert a pin through the thick spot on your foil square.


Then insert the pin into your wreath. Crumple the foil a little, but not too much. Once you get going this won’t matter as much. You want to have each piece standing up as opposed to flattened out. Continue to pin down more foil squares, making sure you’re covering the Styrofoam so that no white shows through.
You don’t need to do the back half of your wreath because you want it to lay flat against your door, so just pin the foil to the top half of your wreath.


After you’ve done a little patch of foil leaves you’ll add your ornaments. Try out an arrangement before you glue it together. It helps to start with the biggest ornament and fill the little ones in around it. Once you’ve settled on an arrangement, glue them down with your hot glue gun. Use lots of glue, you want it to be secure!


Get an assistant if you need to (my kitty Mr. Littlejeans tried to help, but it wasn’t working out, so I enlisted my boyfriend Chris!).


Keep cutting and folding the little squares and pinning them to your wreath. You’ll need quite a few to cover it, so just keep going until it’s completely covered!

Crumple the foil in a way that will cover the white around your ornaments. If you’ve glued your ornaments close enough together, you should not need to pin any foil in between them.


Once your wreath is covered in foil, you’re pretty much done! If you need to use a length of ribbon for your hanger, fold it as I’ve done in the picture below and pin it in place.


Hang your pretty retro wreath on your door and enjoy! All in all, I spent $9 on this little beauty, $5 for the wreath and $4 for the ornaments. It’s a cute way to add Christmas cheer to your house when you’re on a budget! If you make one of your own foil wreaths, I’d love to see it! Leave me a link to it on my blog at susannahbean.com so I can check it out! Happy Holidays!!

---------------------------------------------------

Be sure to drop by Susannah's blog and say hello! A huge thank you for the ultra rad and shiny holiday decor! I hope you're into DIY Week as much as I am! There's more where this is coming from! xo

Guest Post: Starry Eyed Charlie DIY Floral Headband!

diy floral headband

Hi Everyone!!! I'm Carla from Starry Eyed Charlie.

diy at starry eyed charlie blog

I've been working on a hair accessory D.I.Y. for some time now and I'm so glad to be doing it for Kaelah's blog. It's very easy and requires few store bought items.

Here's what you'll need:

Photobucket

  • Paper
  • Sharpie
  • Needle
  • Thread
  • Scissors
  • Elastic
  • Ribbon
  • Different Fabrics (I used 1/2 yd of fabric & a sleeve off a vintage dress)

First, you need to create your stencil. Grab a sheet of paper and fold it lengthwise.

Photobucket

Make sure the fold is at the bottom before you draw in your stencil.
Draw in your shape (I did a couple of different styles to add dimension).

Photobucket

Now begin cutting, making sure again that the crease is at the bottom of your page.

Photobucket

Get your fabric and fold it lengthwise, with the crease at the bottom, just like you did for your paper stencil.

Begin folding your fabric in an accordion, aligned with your stencil. Pin the stencil to the fabric at the bottom. 

Begin cutting.

Photobucket

*It is very important to only cut the top of the stencil into the floral shape. The sides and bottom should never be cut.*

When you're finished cutting, you can open up your fabric and it will look something like this:

Photobucket

Fold it lengthwise again. Get a needle and a long piece of thread to begin stitching. You are creating a long stitch along the crease:

Photobucket

Slowly and gently, pull the thread so the fabric begins to bunch.

Photobucket

When you've stitched the whole length, join the two ends. Now, stitch along the middle of the flower so that the fabric is secure.

Photobucket

I made four flowers.

Photobucket

Measure the ribbon so that it fits 3/4 of the way around your head.
Stitch one end of elastic to the ribbon without measuring or cutting the other end.

Photobucket

Now that one side of elastic has been fastened, put the headband back on your head to measure where to cut the elastic. Your headband should be snug.
Sew this other end of elastic to your ribbon. It should look like this.

Photobucket

Attach your flowers by sewing them on one by one on the headband. I chose to alternate colors.

Photobucket

And the finished product:

accessory diy at starry eyed charlie blog

Wear it with ruffles and wavy hair for a romantic effect.

vogue italia at starry eyed charlie blog
 (via Vogue Italia)

Thanks for coming along for this D.I.Y. You can see more on my blog or follow me on twitter.

Fairy Dust and I'm Out.

Love,
C

------------------------------------------------------

Thanks so much to Carla for the lovely DIY! I went out and bought some fabric last night so I can try it out next week once everything is settled down and over with! Stay tuned for some more fabulous guest bloggers and sweet DIYs during Little Chief Honeybee's DIY Week!